Beginner's guide to install Ubuntu on VirtualBox
Have you ever thought about trying different operating systems (OS) in your
computer? Or, you may be afraid of installing different OS as it may cause
some other issues in booting up your OS. Fret not, nowadays, we have a handy
virtualization software which can help you experiment without any risk.
4. Now, you will see an virtual machine entry in your VirtualBox Manager. It is time to install the Ubuntu image file to this virtual machine.
This guide will help you in installing Ubuntu on a virtual machine and provide
some other information to make it easier for you to interact with your host
machine. We will use VirtualBox which is a free software created by Oracle.
4 steps to install Ubuntu on VirtualBox
1. Download Ubuntu OS image
Ubuntu is free of charge and can be downloaded from this link:
https://ubuntu.com/download.
For this tutorial, we will use Ubuntu Desktop 20.04 LTS.
2. Download and install VirtualBox
You can download VirtualBox software from this link: https://www.virtualbox.org/wiki/Downloads
Under VirtualBox platform packages, choose the files based on your existing
operating system.
It is also recommended to download the extension pack as well.
Upon successful installation, open up the software.
3. Install Ubuntu on VirtualBox
We will create a new virtual machine for our Ubuntu OS.
- Name: name of your virtual machine
- Machine Folder: where you want the virtual machine files to be put in
- Type: operating system type. Choose Linux
- Version: operating system version. Choose Ubuntu (64-bit)
- Memory size: RAM size of your virtual machine. By default, VirtualBox will define a specified RAM size, but you can modify it to be smaller or larger. It is recommended to put a larger amount so our virtual machine will run more smoothly.
- Hard disk: since we are creating a new virtual machine, we will create a new virtual hard disk now.
Once all the details have been filled in, click on
Create.
3. After that, you will be asked to define the hard disk size and type.
I'd recommend to use VDI as the file type as it is native to VirtualBox
and set the storage as dynamically allocated to save some unused space.
Once done, click on Create.
4. Now, you will see an virtual machine entry in your VirtualBox Manager. It is time to install the Ubuntu image file to this virtual machine.
5. Imagine if you are installing in an actual computer, you will need
to insert a DVD to the computer so you can install the operating
system. In VirtualBox, you can "insert" the Ubuntu image file in the
virtual machine's "DVD-ROM". Under the Storage section,
click on [Optical Drive] Empty.
6. Click on Choose a disk file.
10. Click on Install Ubuntu.
11. Choose your preferred keyboard layout, otherwise just leave using
the default option, and click Continue.
12. Choose Normal Installation and click
Continue.
13. Since we are creating a new virtual disk image, there is nothing in
the drive yet, so we can safely choose
Erase disk and install Ubuntu. Click on Install Now.
14. The confirmation dialog will be prompted. Click
Continue.
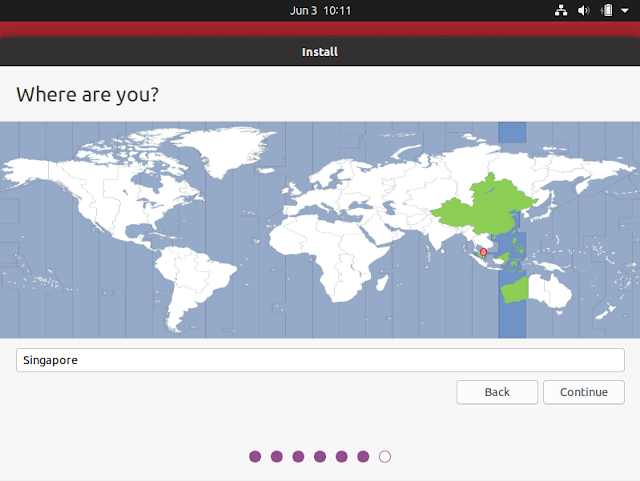
15. Choose your location and click Continue.
16. Fill in all the details. The username and
password you enter will be used as the credentials for the
virtual machine. Click Continue.
17. The installation will commence. Wait until it finishes.
18. Upon completion, click Restart Now.
19. If the following is shown, press Enter.
20. The virtual machine will be restarted. Once loaded, you will be
prompted with the user that you fill in previously. Click on the
user and enter your password.
21. Congratulations! Your virtual machine is ready to use.
4. (Optional) Install VirtualBox Guest Additions
You may notice that the virtual machine screen resolution is quite
small.
In order to make it display the full resolution, we can install the
VirtualBox Guest Additions that we have downloaded before.
1. Navigate to the folder where you downloaded and double click on
the file.
2. A confirmation dialog will be shown. Click Install.
3. Scroll down to the bottom and click I Agree.
4. Wait until the extension pack is installed successfully.
5. Now, start your virtual machine. Once it has been
started, click on Devices menu and click
Insert Guest Additions CD Image.
6. A confirmation dialog will be shown. Click Run.
7. Enter your password to proceed with the
installation.
8. Wait until the installation is complete and press
Enter.
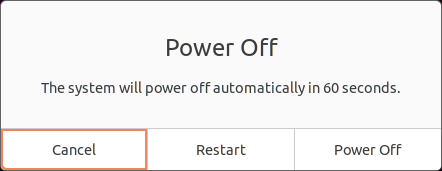
9. Restart Ubuntu by clicking the top right icon, Power Off / Log Out and Power Off.
10. Choose Restart.
11. Once restarted, proceed to enter your credentials. Once in the
desktop screen, click on the resize window and see the effect. Now
Ubuntu is able to use bigger resolution.
Hope it helps!


Comments
Post a Comment